It’s hard to tell what the properties currently in the Essential Graphics panel affect. You could change each of their names to make their effect clear, but it’s easier to group them. You’ll create groups for properties related to the episode title and those related to the background effect.
- Choose Add Group from the menu at the bottom of the Essential Graphics panel. (By default, it says Add Formatting.)

- Name the group Episode title, and then drag the Episode name and Position properties into the Episode title group. The Size slider travels with the Episode name property.
- Deselect all properties, choose Add Group from the menu again, and then name the new group Background effect.
- Drag the Color Balance (HLS) Saturation, Color Balance (HLS) Lightness, and Noise Amount of Noise properties into the Background effect group.

- Hide the properties for all layers in the Timeline panel, and then choose File > Save to save your work so far.
Enabling image replacement
For this template, you want editors to be able to replace the background image with one that is appropriate for the episode. You can easily add a placeholder image to a motion graphics template that can be replaced in Premiere Pro.
- Drag the Embrace.psd layer from the Timeline panel to the Essential Graphics panel.
- Click Embrace.psd, select the text, and type Episode image.

3.Choose File > Save to save your work so far.
Protecting the timing of a section
The Responsive Design features in After Effects and Premiere Pro let you author adaptive motion graphics. The Responsive Design – Time feature, specifically, preserves the duration of time in a particular region of a composition in a Motion Graphics template while enabling time stretching in unprotected regions. You can preserve the timing of specific areas in compositions you export as Motion Graphics templates or in nested compositions within After Effects.
You’ll protect the duration of the episode title’s transition. That way, an editor in Premiere Pro will be able to shift the timing of other areas, such as shortening the time before the text explodes, but speeding up or slowing down time elsewhere won’t affect the protected area.
- In the Timeline panel, drag the Work Area Start marker to 2:00.
- Drag the Work Area End marker to 5:00.
You’ve reduced the work area to the area that you want to protect from time-stretching.
- Choose Composition > Responsive Design – Time > Create Protected Region From Work Area.
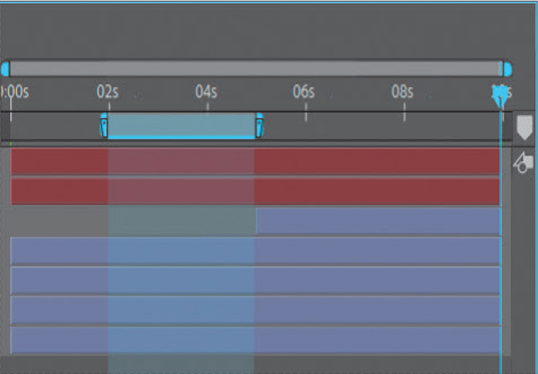
The protected area is shaded in the Timeline panel.
- Choose File > Save.